|
Hello again, The first of the seasons coffee, and how we process it:- Part one:- Late October, and the first few cherries are starting to ripen on the coffee bushes, another 2 to 3 weeks, and we should be ready to start on the picking of the first crop: as long as we don't get a late-season, storm or hurricane!! This year we almost got one, the outer fringes of hurricane Tomas: fortunately, very little damage to the coffee, lost a few Bananas and some of the ripe Citrus fruits.
As we get into November, winter setting in, evening temperatures dropping, will only be a few weeks before I will need to put on a woolie jumper, over the T shirt!! COLD!!! Overnight it can drop below freezing!! (Well: the Jamaican definition of "freezing" anything below 60F!! I might even be forced to turn down the A/C!! (close some of the open doors and windows!) I do have heaters (they came with the house, when I bought it , two electric, and two kerosene) never used them, but they do work (I checked!!) Heating, is NOT a necessity, in "paradise"!! The nearest thing I have ever needed in the way of house "climate control": the very occasional use of an office style, cooling fan!! When I get friends up from Kingston, they sometimes need to use the heaters, being unaccustomed to the coolness of the evenings, up in the mountains. Lowest temperature I have recorded (about 4.00am, in mid February) was 55F, for friends up from Kingston, that is about 10 to 15F colder than they ever experience, down on the coast! We are now almost ready to get the first crop in. Always a big decision; how accurate are our estimates of this seasons crop: there is still the (rapidly receding) possibility of a damaging storm, even after the "official" hurricane season: and we have yet to get the price, the "local system" is going to pay for our coffee (they ONLY buy, fresh picked cherry bean coffee) so how much to sell, and how much to keep for ourselves? With the best quality coffee coming from the later pickings, any mistake now, and we will not have sufficient for our own drinking! A very stressful time!! When you get used to having a maximum stress level, of making the daily decision as to what to get out of the freezer, to defrost, for the evening meal: make sure the dogs are all fed, and check that there is enough beer in the fridge, to last the evening!! Be fair: I am retired, and have had more than my fair share of working in a most stressful environment! Picking the coffee First thing is a quick survey of the plantation, and check that there is sufficient coffee, ready to pick: followed by a trip to the local rum shack, buy a few tots of rum, or some beers, for the locals, and spread the word that some pickers are needed, and await the arrival of part of the local rent-a-mob!
Most of the coffee plantations, including mine, in and around, this area, are far too steep for anything other than hand-picking: on my plantation, the slope varies between 30 and 60 degrees, and appears to average out at around a 45 degree slope: not the remotest possibility of being able to use ANY form of mechanical, picker. We send the coffee pickers out to scour the plantation for the ripe coffee berries (as the beans ripen over a few months, 3 pickings, per season, is the norm). They carry the beans back to the house, and they are carefully measured, and checked, and we work out the price of their labours. Current rates are J$800 (about US$9) per box of coffee (about 60 pounds of cherry berries), and the really top pickers, can pick between 2 and 3 boxes per day, even on these very steep plantations. We have to check the cherries as they come in, to ensure that the pickers are not "cheating" and picking a whole load of unripe beans, in with the cherry beans (the unripe beans are useless, and are what should be the next picking: so a box of unripe beans, costs us twice: useless now: and not there on the bushes, ripening, for the next picking). First thing is to "float" the cherries, put them in a water filled container, stir them well and scoop off and discard any of them that float ("floaters") as these are the beans that are no good, usually due to infection by the coffee borer beetle, that eats out the centre of the bean. You can try and picture just how small these beetles are, when there can be many dozens of them, in a single coffee bean. These floaters, are immediately destroyed, to kill any borer beetles, that are still in them. This process also washes the cherries, removes any detritus, and much of any residue that may be left over from the pesticides (insecticides, and fungicides). We expect to lose any where from 2% up to 7% of the coffee, to the borer beetles: the first picking having the highest number of infected beans, and our last picking, the least.
The black dot to the extreme right of the photo, is about the size of a borer beetle. The infected coffee beans are withered, black, and on opening them, there is almost nothing inside, just the outer casing left, uneaten. The processing. I have read about many different ways to process coffee, and done some considerable research on the different methods: I have based the way I do it, on "tradition", rather than any "modern" methods: using the years of collected wisdom, in the locale, and have experimented with different ways of doing it: what you will read below, is the combination of all this input, much testing and experimentation, and the method that gives MY coffee, the best flavour!! It may not work with other coffees, in different Countries, but it works here! In the pictures, below, we are hand processing in small batches; of 10/20 pounds of cherries, in each batch. After floating, the wet cherries are put in the "pulping machine", which strips off the outer part of the cherry berry, and releases the beans inside; turn the handle (by hand!) a rotating drum, is covered in small "cutters", which tear the outer husks open, and discards them into a trough, below the machine, the coffee berries exit from the front of the machine, and into a collecting tub. At this stage the beans are a pale yellow/brown, and covered in a sweet, sticky, mucus. there are always a few bits of the trash, that go through with the beans: these can be separated after the next part of the process, the fermenting.
The coffee beans end up in the blue box, to the left of the pulper, and the trash drops into the brown box, under the machine. The pulping machine, well second hand, well worn out, and it took some "bodging" to get it to work properly! The machine is quite efficient, but about 10% of the beans end up with the trash, and need to be removed. The machine requires plenty of water, poured over the cherries, to lubricate the process, and most of it ends up with the trash. To separate the beans from the trash: the beans are heavier than the trash, so we stir it all up, and let the beans collect at the bottom, and the trash is scooped off the top. We lose a few beans during this process, but no more than about 1%. The next stage is to remove the sticky mucus that surrounds the beans, a process called "fermenting": there are several ways of doing this, MY choice is to do exactly as the name suggests, and ferment the coffee beans, just as it has been done for a thousand years! The latest, modern method, is called "Aquapulping", whilst I have not been able to get a good look at one of the machines, my understanding is that the beans are mechanically "scrubbed" in water, and the process takes only a few minutes. Before the day of these machines, the beans would be rinsed off, and then soaked in clean water, for 24 to 36 hours; testing the beans to see when they are "done" (when the mucus has dissolved, they change in feel, from "lubricated" to "rough"). I have read in many articles on this part of the process, most of them "pontificating" that the beans should be soaked in fresh, clean water, for the minimum length of time, just long enough for the mucus, to dissolve. When the cherries are picked from the bushes, just like wine grapes, they are covered with wild yeasts, and the water used during the pulping, comes out a "yeasty" yellow colour, as it is full of the washed off yeast cells; we reuse the "pulping" water throughout this initial processing, and ferment the beans for up to 4 days, in this yeasty water. Within a few hours there is a thick scum on top of the water (exactly the same as appears on top fermenting beers, and wines) made up of the yeast cells, which are fermenting the sugars from the mucus, into alcohol; and the aroma is quite "heady"!! (Fancy some "coffee Mucus" wine??) The whole lot is stirred every few hours, and the alcohol in the mixture, killing all and any infections in the fermenting vat; there are a few beans that float up during the fermenting, these are scooped off, and discarded.
We allow the beans to ferment, until there are no more bubbles appearing: this can take between 2 and 4 days, depending on the ambient temperature: the beans are then washed, put on to wire trays, rinsed, and allowed to drain.
It is the alcohol from the fermenting, on the coffee berries on the bushes, that attracts the borer beetles, they are also attracted by the alcohol, from my fermenting; and on top of the fermenting vat, hundreds of them drowned, in the water! At least they die "happy", being well drunk!! I have experimented with many different "fermenting" methods, from scrubbing the beans, fresh water soaking, and as described above, fermenting in the yeasty water, for varying lengths of time: and without doubt, the best flavoured cup of coffee, comes from the full ferment. Less than this, and the flavour (comparatively!!!) is a bit "muted", more than 4 days and some slightly "unpleasant" flavours can start to appear. Rather than just rely on my own palate, I have sent samples of my beans (fresh water soaked: 2 day fermentation, and a 4 day fermentation) to some professional tasters: and without exception, the 4 day full ferment, gave the best flavour, and was preferred by the taste-testers. Drying. The traditional method, is on a "barbeque" (a large area of concrete) the beans spread out, and turned continuously, by hand, using wide rakes, in the sun. Most of the large processors, carry the pulped beans, down to the coast, and dry them in the much hotter areas: we consider this to be a "cheat": if the beans are grown here, they should also be processed, HERE!! on the plantation. The first and only time a coffee bean leaves my plantation, is when packed and ready to mail. Of course, there are modern ways of doing it; huge heated drums, and the bean never "sees" the sun! My first attempts at drying my coffee, were not very successful: too many days of the mists, and rains; and having to keep moving the coffee under cover, as soon as it looked like rain. So that by the time the coffee was dried out, the beans were suffering from mould!
The first tendrils of the mists, creeping towards us, We experimented; and now use clear plastic "tents" over the beans, as they dry: we get the beans "touch-dry", on the wire draining trays, turning over every hour or two (the advantage of the wire trays, is that the dry air can get to both sides of the drying beans) takes a day or so, and they are then transferred to wooden trays, painted matt black to absorb as much of the suns heat, as possible: these trays are put, in full sunshine, under the clear plastic "tent", to protect them from any rain; and like a greenhouse, absorb as much heat as possible, from the sun; the ends of the tent are open, to allow the breeze to keep it well ventilated: we turn the beans over every few hours, and they are fully, and evenly, dried, in 2 to 3 weeks. Over 90% of the drying is achieved in the first few days, the longest time is spent getting rid of the last bit of the water: the water content, needs to be around 10% (specification is 9 to 12.5%). Even with little sunshine, the beans are "warm" to the touch, only an hour or so after sun rise, and we don't have to be constantly on alert, in case of a heavy mist, or a shower of rain: as the drying beans are completely protected by the plastic sheeting. The heat retained by the beans, during the day, keeps them slightly warmer than the night air, and they do not suffer with any condensation, problems. It is not the speed of the drying that affects the flavour of the coffee, but the "even-ness" of the drying: the coffee needing to be turned over, regularly, so that it dries evenly, throughout the bean, uneven drying can produce pale patches on the dried beans, which are then discarded during grading. The beans must not be allowed to reach a temperature of 120F, or the flavour is affected: in full, strong sunshine, on the matt black wooden trays, the temperature of our beans rarely reaches 105F. SO:- as we wait for the beans to dry, time to relax a little, and, for a change, we will go and do the weekly shopping, up on the North coast, at Buff Bay, instead of Kingston. We drive off, and about 100 yards outside my gates, is the source of the Buff River, and we follow the valley, all the way to the Caribbean sea: the valley is a deep "V" shaped, river valley, with a very picturesque river running its' length: at times in a deep, narrow gorge, barely wide enough for both the river, and the road, and in other places, as in the picture below, the river widens out a little. After heavy rains, this "stream" becomes a raging torrent!!
One of the great things about doing the shopping at Buff Bay, instead of Kingston, are all the little eateries, along the coast, (the shops are nowhere near as good, but everything is available) so instead of the usual "snack" lunch, we get a proper lunch!! and settle for something "lighter" for our evening meal:- Today's recipe: Something very simple, if you can get the right sort of HOT sauce; the "thin" (dry to the palate, and too much vinegar,Tabasco style), sauces, don't work; you need a very hot, but slightly "sweet", and "bits-in-it" sauce, not a Mexican style, Salsa (but possibly a really MEGA hot one, if not too thick, might work) a "chopped pepper" sauce should work, but may need a touch of sugar mixed with it. Deep fry some ordinary "fish fingers", and dunk into a sauce, made with equal amounts of the hot pepper sauce, and Mayonnaise; unless you are able to source (possibly a very English thing) "Salad Cream", which makes the "perfect" dunk-in sauce!! You should be able to make a passable substitute; by mixing a little sugar, salt, pepper, and mustard, into a really thick, Mayonnaise (and a little crushed garlic, would only "help"!!). Try this as a party dip (with warning notice!!) and serve with a really cold, full bodied, Lager, beer, like our Jamaican, Red Stripe. This recipe is probably the very best preparation of the tastebuds, to receive the full impact of a really hot mug of the best of our coffee!! Part 2 follows...... Robin Plough, friend of www.coffee4dummies.com For questions about JBM, mail to: Этот e-mail адрес защищен от спам-ботов, для его просмотра у Вас должен быть включен Javascript |
Processing our coffee (part 1)
Processing our coffee (part 1)


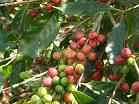 Almost ready to pick!!
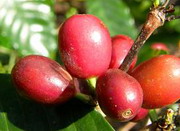 Perfect cherry berries, ready to pick
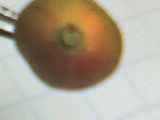 The small dark mark is the hole made by the borer beetle, in the base of the coffee fruit, at the side of the "scar" left by the flower petals.
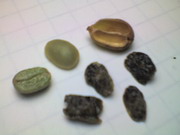 the contents of infected coffee fruit, alongside 2 uninfected beans, the small dark mark on the base of the outer fruit case (top of picture) is the tunnel made by the beetles entry to the coffee berry.
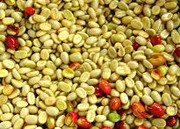 Beans straight from the pulper
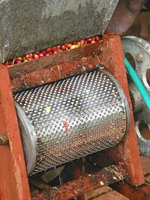 the pulping machine
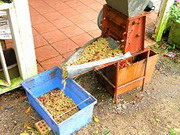
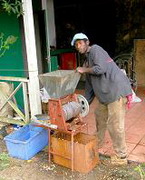 Chris working the pulper.
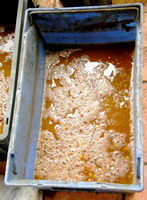 The yeast "bubbles" that form on the fermenting vat, any beans that float up during the fermentation ("escaped" floaters) are destroyed, along with any borer beetles, they may contain.
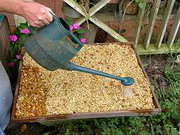 Notice the trash which has been separated off the beans, in the lower, left corner of the draining tray, as the beans are given their final rinsing.
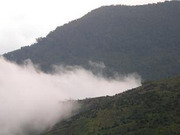
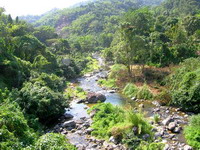 Along the Buff River valley.


